Table of Contents
Working with Transparent Colored Wood Stain
In 1995 I got the idea to paint with transparent colored wood stain. I was wondering what it would look like if you layered different colours of transparent paint on top of each other. How do the different layers work? How transparent is transparent?
Introduction
So I started with 4 pots of transparent paint for wood in the colours yellow, red, green and blue. First on paper. Apply a first coat of colored wood stain and allow to dry thoroughly before applying a second coat.
The applied layer of paint must be thoroughly dry because it is not the intention that the colours mix in wet paint. The colourful result really appealed to me, but the base was too flat and therefore there was a lack of depth. Painting on wood gave the desired result.
The base
To make the transparent colored wood stain come out as bright as possible, a wood type that is as white as possible is necessary, like spruce or pine.
By painting the wood, on the wood grain and knots the paint absorbs differently than in even spots. This surface provides naturally depth in the painting due to its appearance as well as absorbing properties.
Number of layers
The first layer of paint absorbs quickly into the wood. A second layer lies over it like a fleece.
Moreover, it turned out that up to three times the same colour on top of each other, this colour becomes more intense.
More than three layers translucent paint on top of each other have no extra effect. One, two or three layers of the same colour are already 3 times different. These overpainted with one – two or three coats of a different colour is again three times different.
This creates an enormous colour palette with minimal resources.
Acrylic transparent colored wood stain
Working with water-based paint has the advantage that it dries faster than alcyd paint. In addition, I find cleaning the brushes with water more pleasant than with white spirit.
Before applying a new layer colored wood stain, it is important to ensure that the underlying painted layer is thoroughly dry and cured. The first layer absorbs into the wood and can be sanded after about an hour. When applying the following layers, the drying time increases before the paint has hardened. Logical, because the wood no longer absorbs the moisture and the paint layer has to dry completely in the air.
Make it look like you have worked with spray paint
That the paint coat is well cured is important for the tight setting of patterns.
The best result to get a nice even surface is by applying the paint thinly, and therefore well spread out in the direction of the wood grain. An entire plank or entire side of the object is easy to paint evenly in one colour.
But painting patterns free handed, without preventing a thick layer of paint on the edge of the pattern is difficult. By using painter’s tape for a geometric pattern, it is possible to paint a line or rectangle without thickened paint edges. By spreading the brush from the painter’s tape in the direction of the wood grain, the paint can be applied completely evenly.
![]()
![]()
Painters tape
Painter’s tape is available in different widths from 19 mm wide. A width of 19 mm is sufficient to outline the outer edge of a surface to be painted. This gives enough protection to keep the paintbrush within the lines. To make block patterns with different block sizes, use different tape widths.
But what if 19mm wide painter’s tape is too wide? Then you can cut the tape to the correct width with a utility knife. For a piece that is not too long, stick the tape on a hard surface and cut the desired width with a ruler and knife.
If you need a lot of meters of narrow tape, it is more convenient to cut this on the roll. Then lay the roll and blade flat on a flat surface, press the blade into the tape and rotate the roll. Do not press too hard against the blade.
Keep spinning the roll and the blade will go deeper and deeper through the tape.
And never keep the fingers of the hand with which you rotate the painter’s tape for the utility knife!!!!
![]()
![]()
Of course, the painter’s tape must be properly applied to prevent the paint from creeping under as much as possible.
But wood is a natural material. Even if the surface feels completely smooth, there are still imperfections that affect the adhesive strength of the tape and the paint will creep under the painter’s tape.
The edges need to be “cleaned”.
Before the painted surface has dried, remove the painter’s tape and carefully rub off the excess paint along the edges with a damp cloth wrapped around a putty knife. Therefore it is important that the underlying paint layer has hardened and that it is not also rubbed off by the “cleaning”.
Each new coat of paint should be lightly sanded after curing with a fine sandpaper. This is because, despite the thin application of the paint, noticeable edges are created in the taped painted parts. If these are not sanded away, they are a nuisance when masking and painting the next layer.
Freehand painting
But for a completely different effect of painting with transparent colored wood stain, you can of course also paint freehand without masking. Then you consciously want to create the effect that the applied paint is thicker at the edges and therefore less transparent.
Different colours can also be applied in this way. The contrast between transparent and less transparent can even be enhanced by applying extra thick lines of paint or paint drops.
The advantage of this way of painting with colored wood stain is that after applying the first layer you no longer have to sand.
![]()
![]()
Clear acrylic paint
Interim sanding causes the applied paint to lose its shine. Finally, by painting the work with a colourless transparent varnish, the shine is restored.
However, if you look closely you will see that the parts of the pattern with only one or two coloured layers have less shine than the pieces with more layers painted on top of each other. If this effect is not desired, a second or third layer of colourless lacquer should be applied until an even whole has been created.
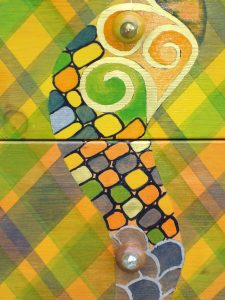
With painter’s tape you can perfectly stick geometric shapes, rectangles, triangles, diamonds, etc. For round shapes or irregular shapes I use plastic adhesive film. Draw the desired shape on the foil and cut it out with scissors or cut with a cutter.
Opaque vs translucent
By applying an opaque paint in moderation, something wonderful is created. This gives both peace and structure to the pattern and the contrast makes the colours stand out more beautifully.
Transparent colored wood stain chart
The described colour palette can also be expanded. Think of the transparent paint in all kinds of wood colours. Mahogany, cherry, oak, ebony, etc. A huge colour palette in shades of brown.
![]()
![]()
The painting possibilities are also endless with black and transparent white paint, and certainly in combination with white and black opaque paint.
![]()
![]()
Enjoy your painting and have a nice day !
Anita fron Unicorn Creation wood art